Environment Variables Guide
Regardless of the deployment method you choose, you need to configure the following core environment variables. These variables directly determine the system's security and functional availability.
🔐 Core Security Keys (Must Configure)
These variables are the foundation of the system's operation and must be set to complex random strings of at least 32 characters.
| Variable | Required | Description & Recommendation |
|---|---|---|
ENCRYPTION_KEY | ✅ | Core: Secret for database encryption. All 2FA seeds are encrypted before storage. Do not change once set. Minimum 32-bit random string required. |
JWT_SECRET | ✅ | Login: Used for JWT token signing. High-strength 64-bit random string recommended (Base64/Hex obfuscation suggested). |
CAUTION
Warning: Modifying ENCRYPTION_KEY will render all existing 2FA data unreadable. Ensure a full backup is completed before making any changes.
🛡️ Admission Allowlist (Must Configure)
NodeAuth refuses public registration; you must preset the users allowed to enter.
| Variable | Required | Examples & Description |
|---|---|---|
OAUTH_ALLOWED_USERS | ✅ | Emails or Telegram IDs allowed to login. Separate multiple users with commas ,. E.g.: admin@example.com,12345678 |
☁️ Login Platform Configuration (At least one, multiple supported)
You must configure at least one third-party login method; otherwise, you will not be able to log into the system.
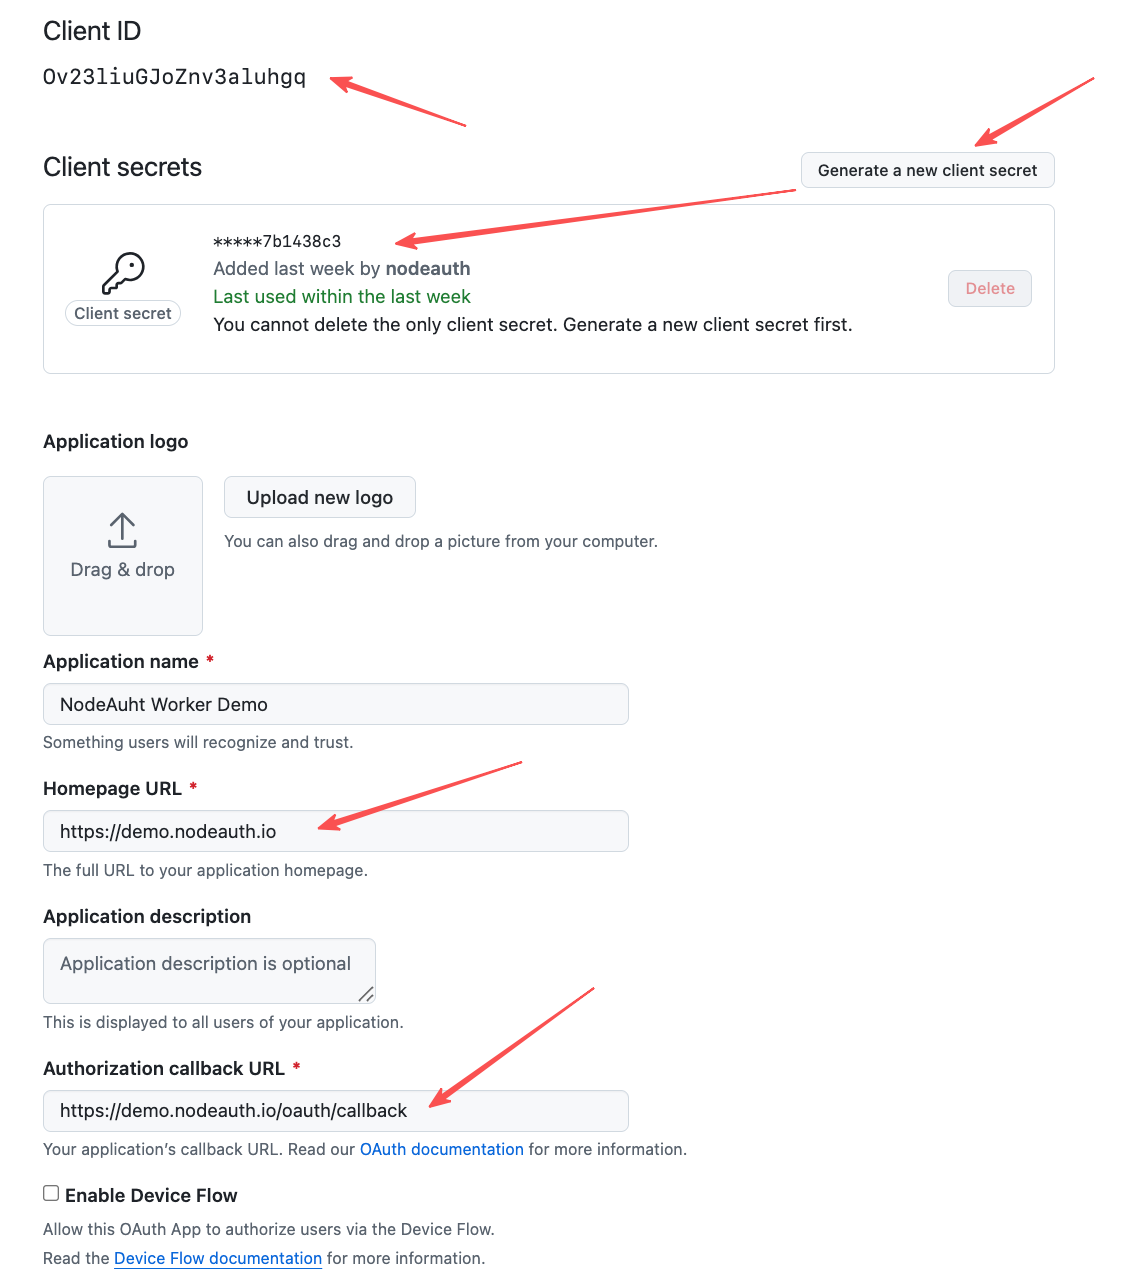
1. GitHub (Recommended, Easiest)
- Visit GitHub Developer Settings -> OAuth Apps -> New OAuth App.
- Homepage URL:
https://your-domain.com - Authorization callback URL:
https://your-domain.com/oauth/callback - Record the
Client IDandClient Secretafter registration. - Fill in Environment Variables:
OAUTH_GITHUB_CLIENT_IDOAUTH_GITHUB_CLIENT_SECRETOAUTH_GITHUB_REDIRECT_URI:https://your-domain.com/oauth/callback
Click to view: GitHub OAuth Configuration Mockup
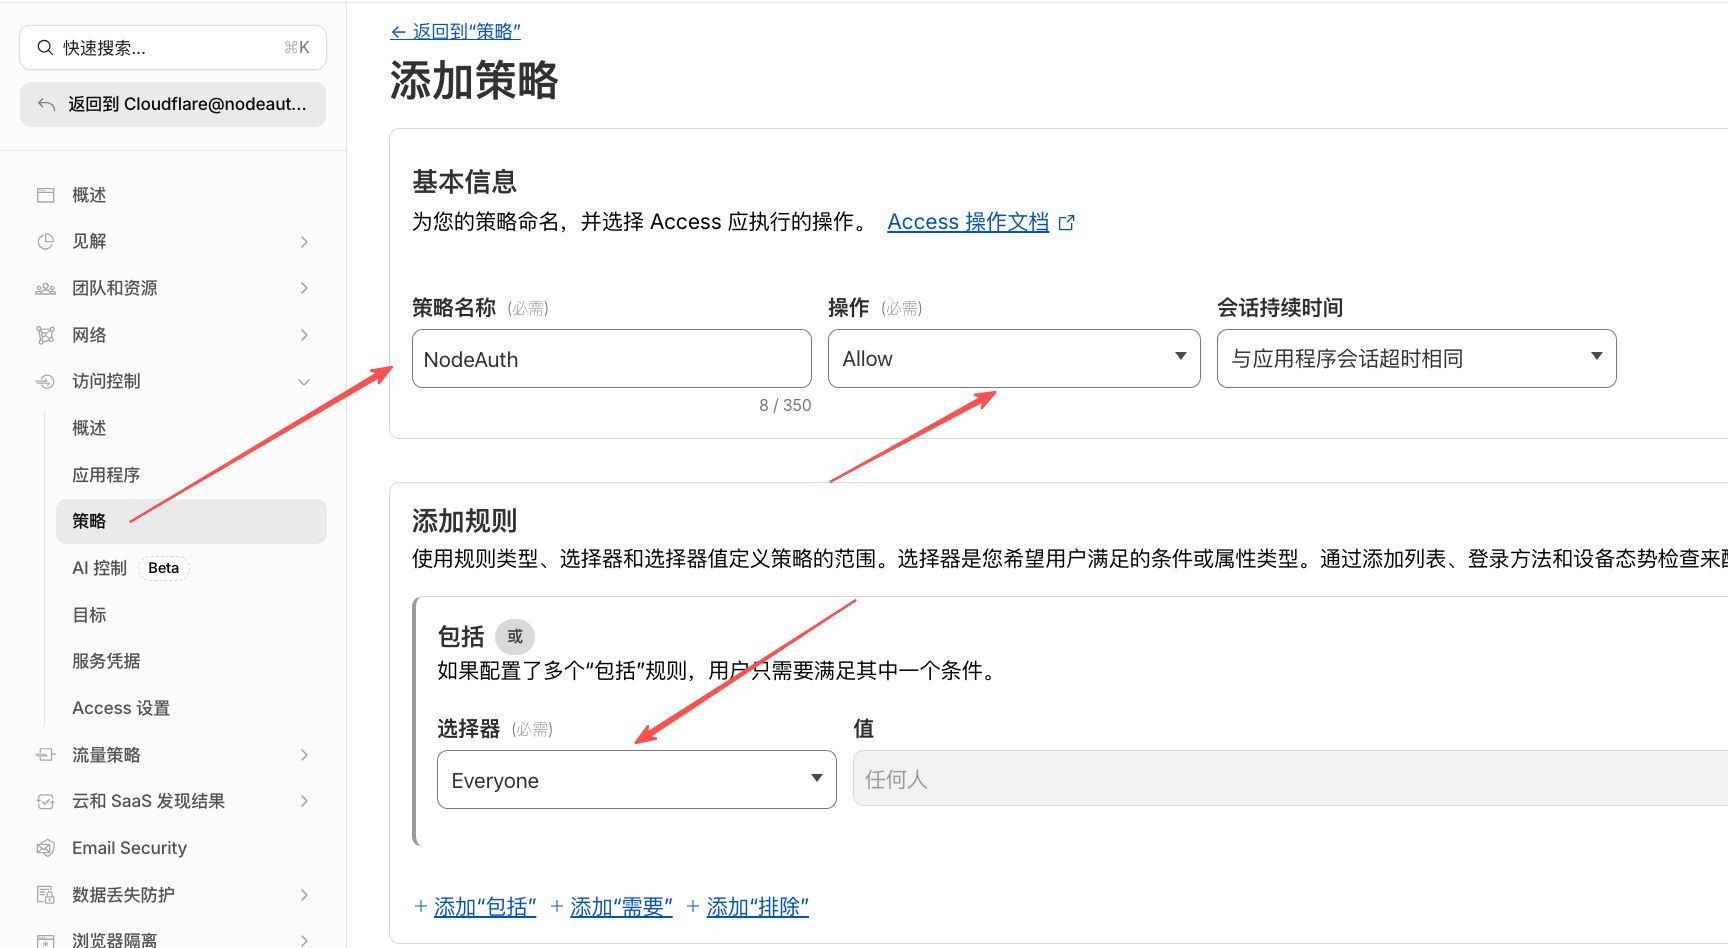
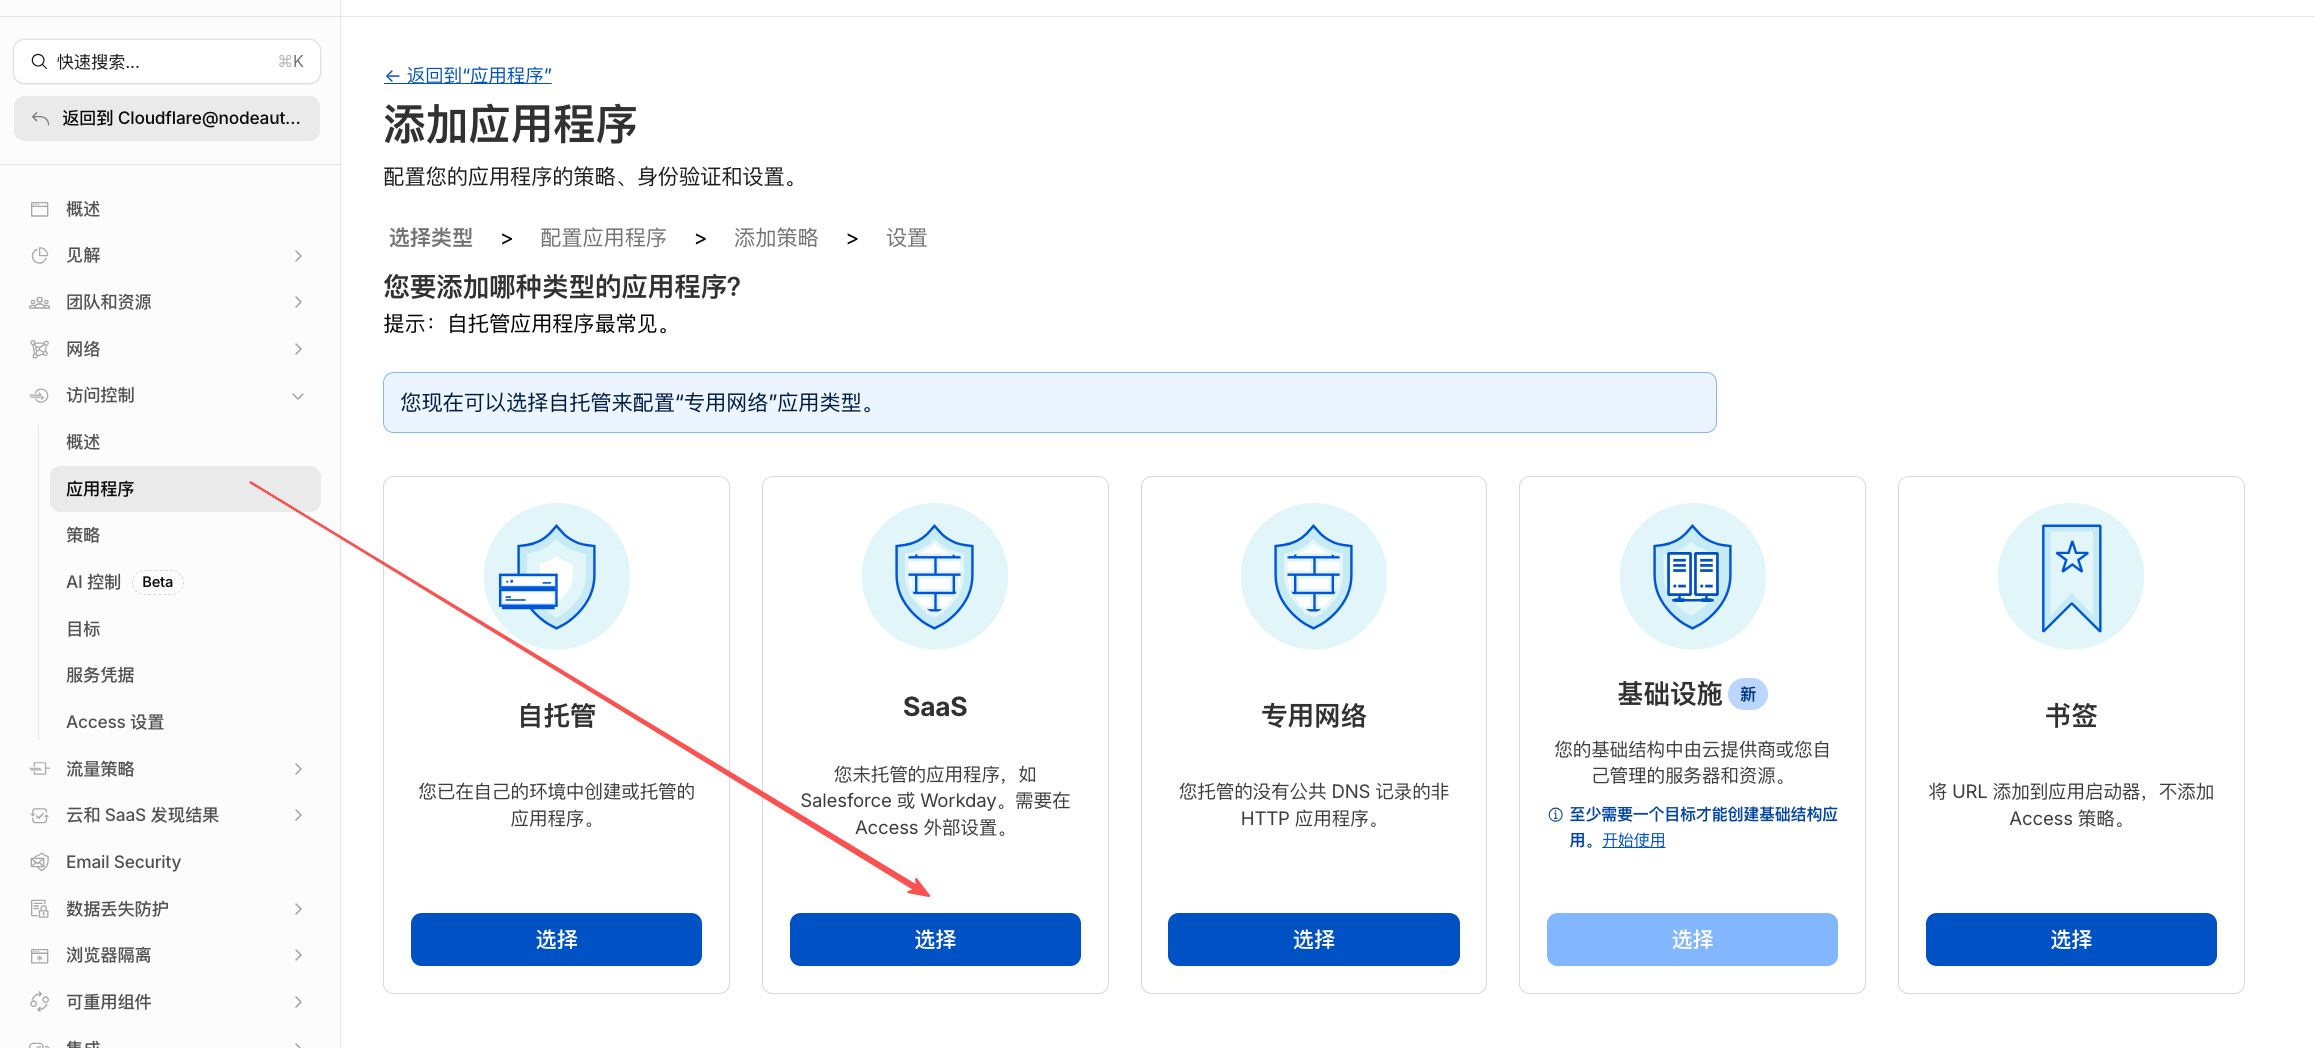
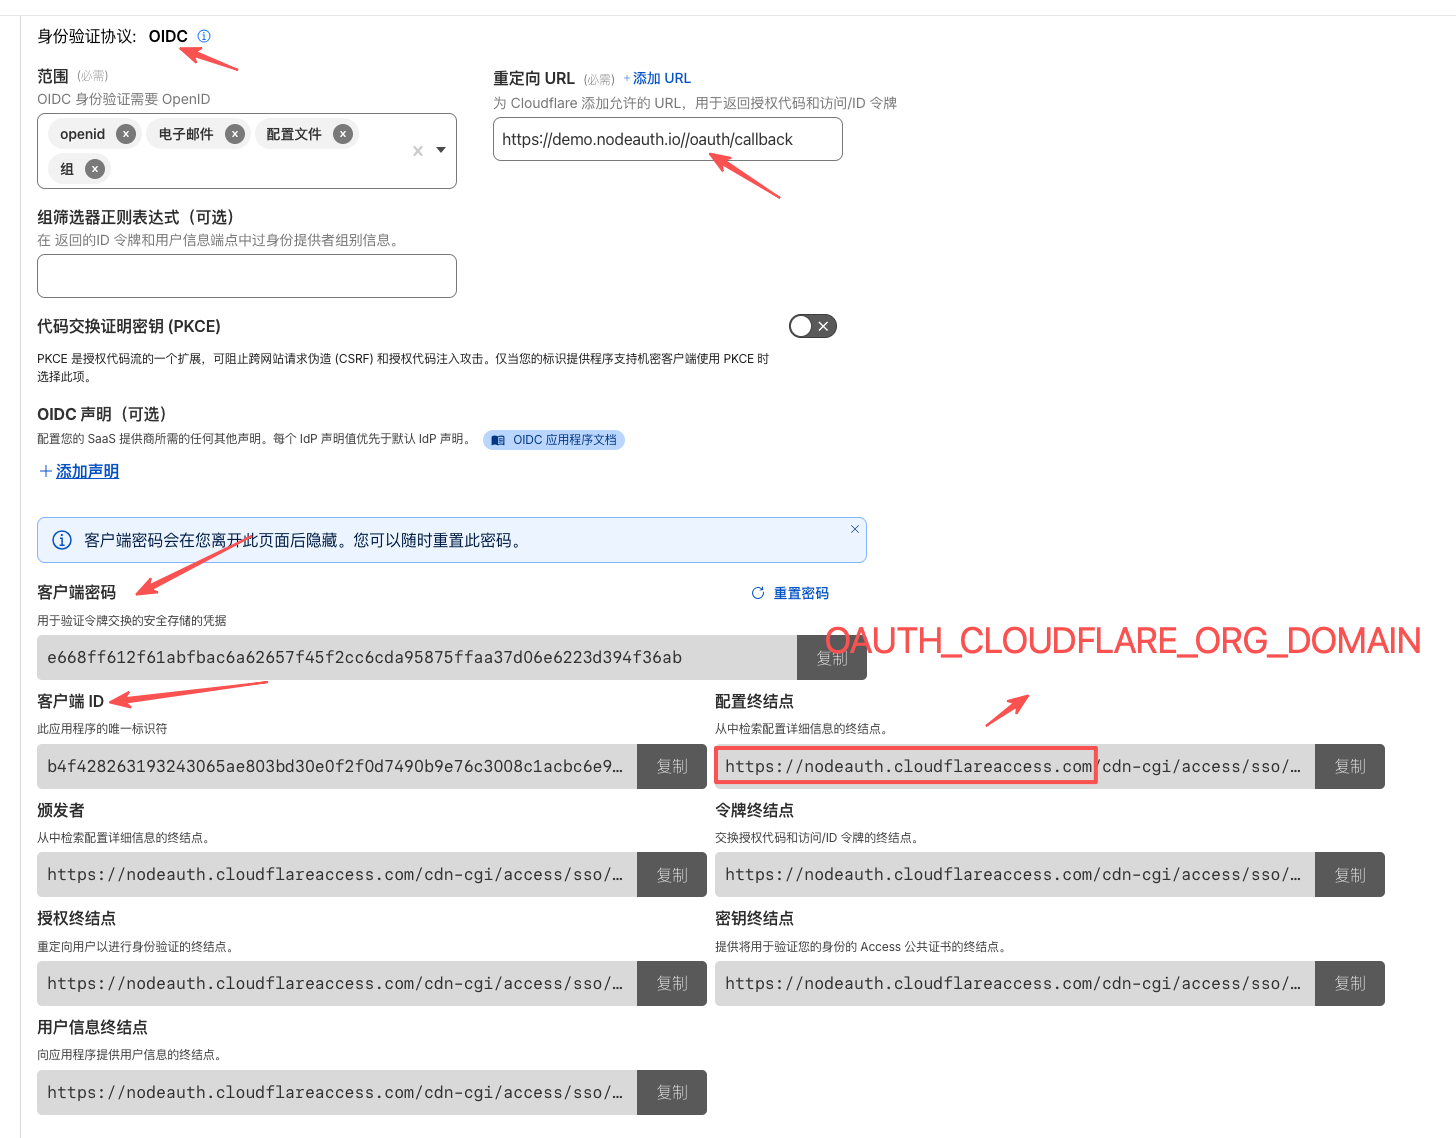
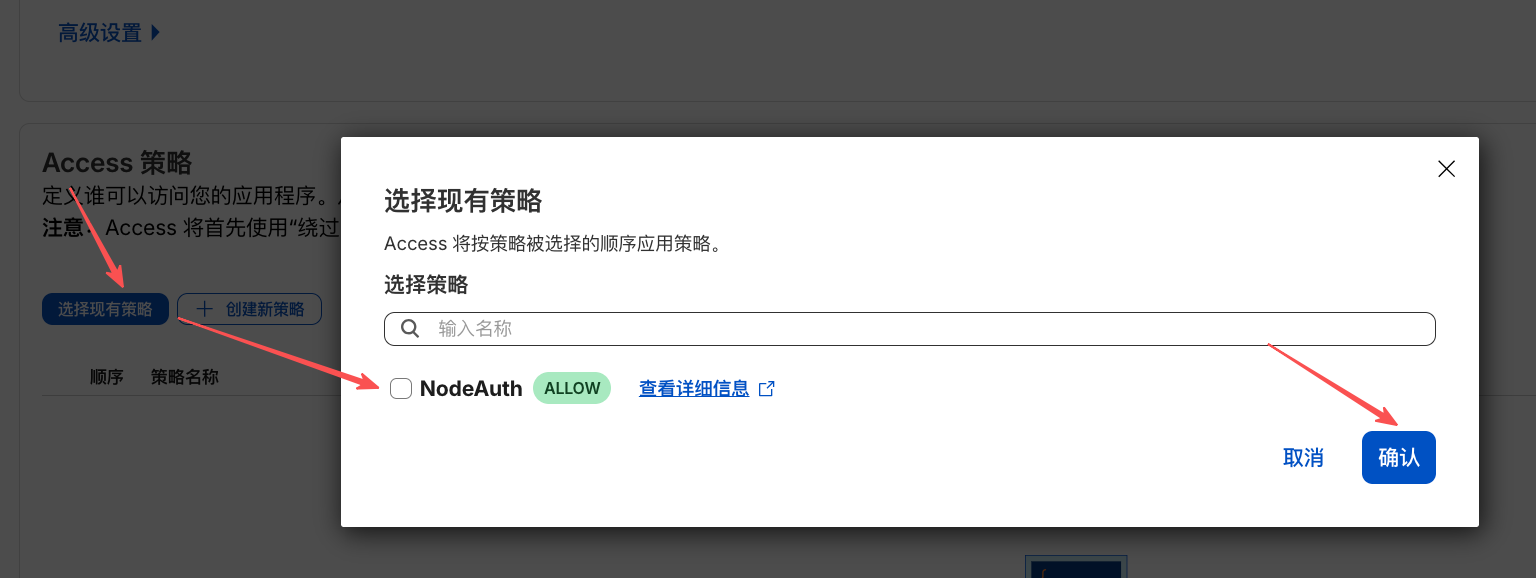
2. Cloudflare Access (Zero Trust)
- Go to Cloudflare Zero Trust Dashboard -> Access -> Applications.
- Click Add an Application -> select SaaS.
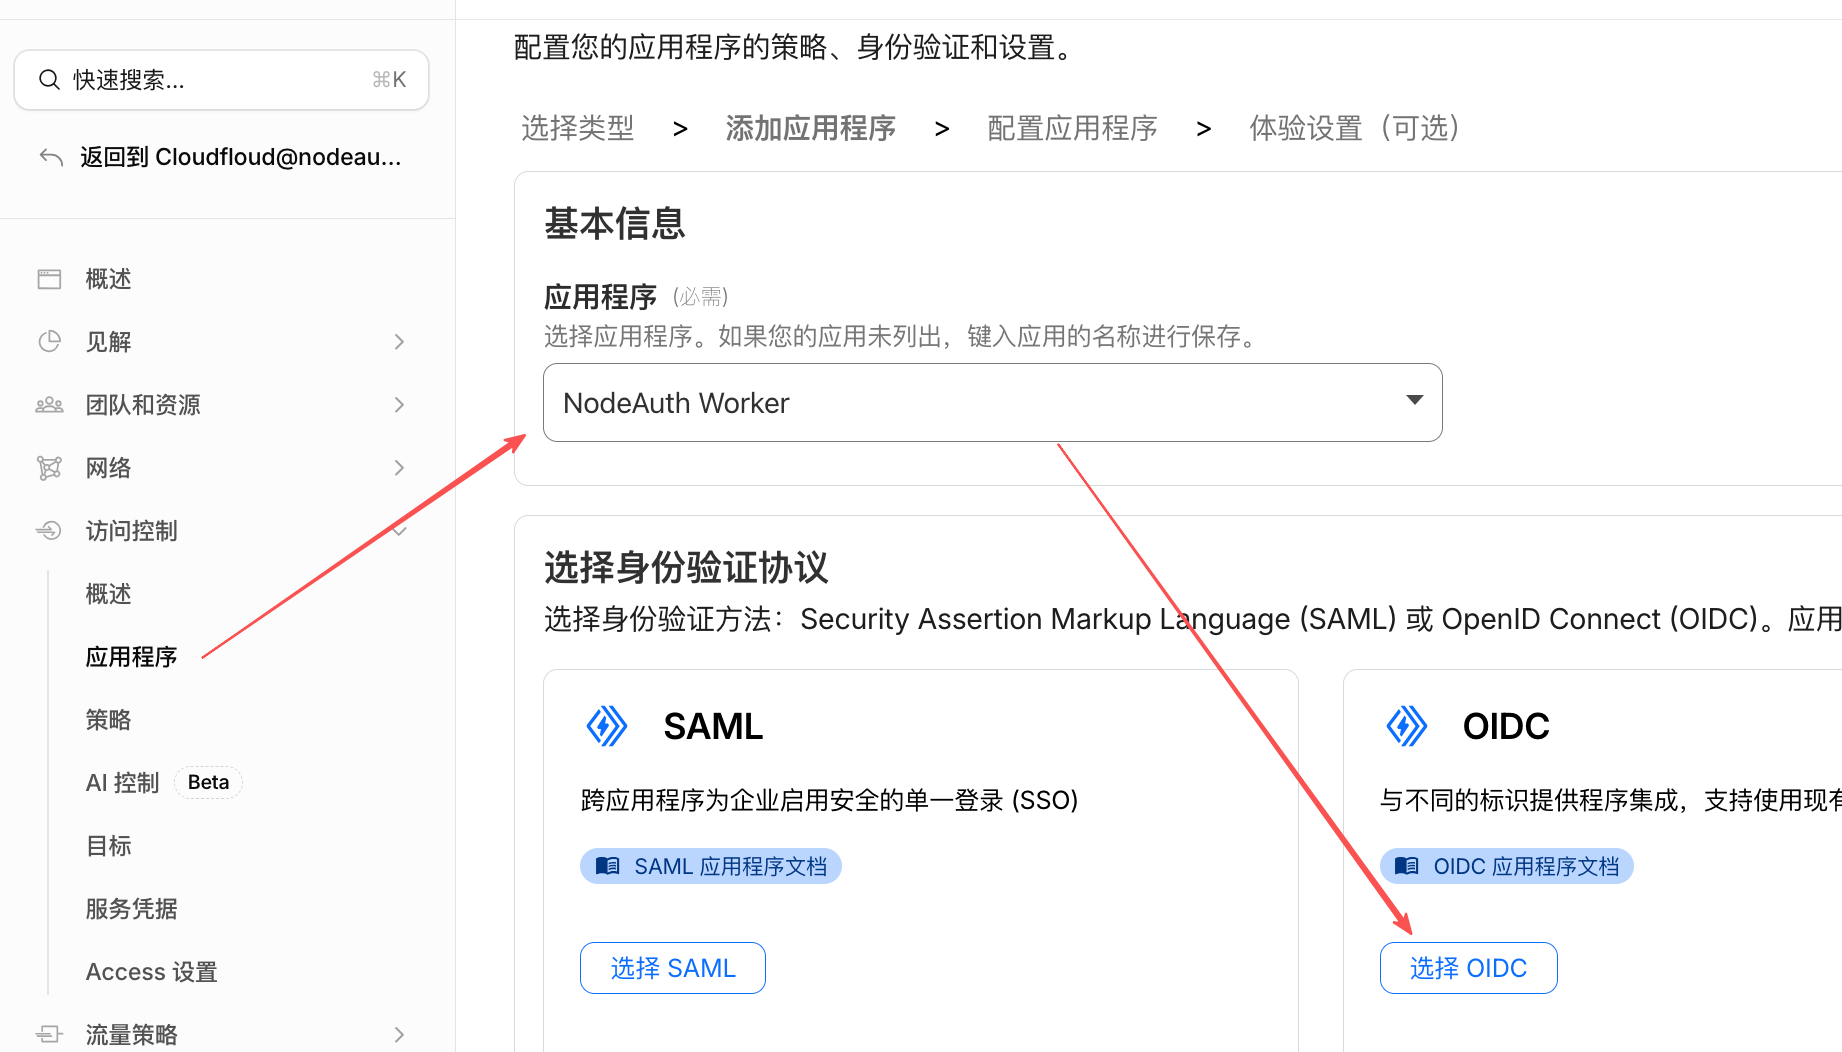
- Application name:
nodeauth - Authentication protocol:
OIDC - Redirect URL:
https://your-domain.com/oauth/callback - Get the
Client IDandClient Secretfrom the configuration page. - Fill in Environment Variables:
OAUTH_CLOUDFLARE_CLIENT_IDOAUTH_CLOUDFLARE_CLIENT_SECRETOAUTH_CLOUDFLARE_REDIRECT_URI:https://your-domain.com/oauth/callbackOAUTH_CLOUDFLARE_ORG_DOMAIN: Your team domain (e.g.,example.cloudflareaccess.com)
Click to view: Cloudflare Access OAuth Configuration Mockup
3. Google
- Go to the Google Cloud Console and create a new project.
- Navigate to API & Services -> OAuth consent screen and complete the basic setup.
- Navigate to Credentials -> Create Credentials -> OAuth client ID.
- Choose application type: Web application.
- Authorized redirect URIs:
https://your-domain.com/oauth/callback - Fill in Environment Variables:
OAUTH_GOOGLE_CLIENT_IDOAUTH_GOOGLE_CLIENT_SECRETOAUTH_GOOGLE_REDIRECT_URI:https://your-domain.com/oauth/callback
4. Telegram
While Telegram doesn't require a REDIRECT_URI variable, you need to bind the domain via BotFather:
- Search for and add the official bot @BotFather on Telegram, send
/newbotto create a bot. - Record the generated Token (
OAUTH_TELEGRAM_BOT_TOKEN) and Username (OAUTH_TELEGRAM_BOT_NAME). - Send the
/setdomaincommand to @BotFather, select your bot, and enter your application domain (e.g.,nodeauth.pages.dev, without https). - Critical Step (Register Webhook): Replace
<Token>,<domain>, and<Secret>(at least 32 characters) in the following link and visit it once in your browser:https://api.telegram.org/bot<Token>/setWebhook?url=https://<domain>/api/telegram/webhook&secret_token=<Secret> - Fill in Environment Variables:
OAUTH_TELEGRAM_BOT_NAMEOAUTH_TELEGRAM_BOT_TOKENOAUTH_TELEGRAM_WEBHOOK_SECRET: The<Secret>string you set above. Get a high-strength random string
5. Gitee
- Visit Gitee Third-party Application Settings -> Create Application.
- Application Callback Address:
https://your-domain.com/oauth/callback - Check permission:
user_info. - Fill in Environment Variables:
OAUTH_GITEE_CLIENT_IDOAUTH_GITEE_CLIENT_SECRETOAUTH_GITEE_REDIRECT_URI:https://your-domain.com/oauth/callback
6. NodeLoc Community
- Visit NodeLoc OAuth Settings and create an application.
- Redirect URI:
https://your-domain.com/oauth/callback - Fill in Environment Variables:
OAUTH_NODELOC_CLIENT_IDOAUTH_NODELOC_CLIENT_SECRETOAUTH_NODELOC_REDIRECT_URI:https://your-domain.com/oauth/callback
7. Web3 Wallet Login (WalletConnect)
- Register and create a new project at WalletConnect Cloud.
- Fill in:
OAUTH_WALLETCONNECT_PROJECT_ID. - (Optional)
OAUTH_WALLETCONNECT_SELF_PROXY=trueto enable built-in proxy.
📦 Automatic Cloud Backup Configuration (Optional)
For detailed configuration steps, please refer to the Cloud Backup Guide.
If you have already configured Google login, some variables can be reused, but the Redirect URI must use a backup-specific path.
| Cloud Drive | Client ID Variable | Client Secret Variable | Backup Redirect URI Variable |
|---|---|---|---|
OAUTH_GOOGLE_CLIENT_ID | OAUTH_GOOGLE_CLIENT_SECRET | OAUTH_GOOGLE_BACKUP_REDIRECT_URI | |
| OneDrive | OAUTH_MICROSOFT_CLIENT_ID | OAUTH_MICROSOFT_CLIENT_SECRET | OAUTH_MICROSOFT_BACKUP_REDIRECT_URI |
| Dropbox | OAUTH_DROPBOX_CLIENT_ID | OAUTH_DROPBOX_CLIENT_SECRET | OAUTH_DROPBOX_BACKUP_REDIRECT_URI |
| Baidu | OAUTH_BAIDU_CLIENT_ID | OAUTH_BAIDU_CLIENT_SECRET | OAUTH_BAIDU_BACKUP_REDIRECT_URI |
Note: Backup Redirect URIs follow the format https://your-domain.com/api/backups/oauth/[platform]/callback
🗄️ Database Engine Configuration (Only for Docker Deployment)
If you use Cloudflare Workers deployment, the system will automatically use the D1 database, and no configuration of the following variables is necessary.
If you are deploying on Docker or your own server:
- Default using SQLite: Simply mount the
/app/datadirectory; no configuration of the following variables is needed. - Using MySQL / PostgreSQL: You must fully complete all the following connection information (
DB_HOSTtoDB_NAME).
| Variable | Required (non-SQLite) | Default | Description |
|---|---|---|---|
DB_ENGINE | ✅ | sqlite | Database Type: supports sqlite, mysql, postgresql. |
DB_HOST | ✅ | - | Database Server Address. Supports local localhost, Docker service name mysql-db, as well as remote domains (e.g.: aws-1.pooler.supabase.com) or public IPs. |
DB_PORT | ✅ | - | Database Port. MySQL default is 3306, PostgreSQL default is 5432. |
DB_USER | ✅ | - | Database username. |
DB_PASSWORD | ✅ | - | Database password. |
DB_NAME | ✅ | - | Specific database name. |
DB_SSL | ❌ | false | Whether to enable SSL connection (recommended as true when connecting to remote cloud databases like Supabase). |
⚙️ Other Optional Configurations
| Variable | Default | Description |
|---|---|---|
LOG_LEVEL | info | Log level: debug, info, warn, error |
PORT | 3000 | (Docker only) Backend listening port |
🛡️ Config Hardening (Optional)
For ultimate security, NodeAuth supports Prefix Transformation, allowing sensitive information (such as API keys and database passwords) to be stored as encrypted ciphertext in configuration files.
Why use this?
Even if your docker-compose.yml or environment variable file is accidentally leaked, third parties cannot directly read the actual plaintext credentials, building a solid defense-in-depth line.
🔐 Security Tiers
Depending on the nature of the variables, the system provides two levels of security logic:
| Security Tier | Variables | Handling (Prefix) | Description |
|---|---|---|---|
| ⭐ Obfuscation | JWT_SECRET | base64:, hex: | Root anchor for session signing. Supports basic encoding-level obfuscation. |
| 🛡️ Encryption | All other variables | base64:, hex:, aes: | All sensitive variables are protected with high-strength encryption. aes: is highly recommended. |
🛠️ Quick Start (3 Steps)
- Open Tool: Visit the official NodeAuth Deploy Helper (tools.nodeauth.io).
- Generate & Encrypt:
- Generate a 64-bit random string for your
JWT_SECRET. - Paste your secrets into the "AES Encryptor" box, provide your root key, and execute.
- Generate a 64-bit random string for your
- Apply to File: Copy the entire generated lines (including the
aes:orbase64:prefix) and replace the values in your config file.
Example:
# Example snippet
JWT_SECRET=base64:MjAyNjA0MDJfTm9kZUF1dGhfUm9...
OAUTH_GOOGLE_CLIENT_ID=aes:iv:tag:cipher_text_here...
ENCRYPTION_KEY=aes:iv:tag:cipher_text_here...
CAUTION
Warning: Modifying ENCRYPTION_KEY will cause verification code calculation errors or decryption failures for all stored accounts. Do not change it arbitrarily until backups are completed.